When you talk about Network Type Setting on Android, by default, the Android settings only allow the option to have 4G/3G speed as the preference. This may cause your Android phone network to switch between 4G, 3G, and 2G whenever there is even a slight reduction in network coverage. This may be one of the reasons for slowing down the download and upload speed on your Android phone. This Network Type Auto Selection results in slower browsing speed and the web pages may take longer to load. You might be aware the standard Network selection settings available in the ‘SIM cards & mobile networks’ menu. However, we only have an option to select preferred network type; such as ‘Prefer LTE’ and ‘Prefer 3G’ respectively. However, you can resolve this issue if you know about Android customization to dig deep into Access Setting. This method will not require to root the phone or download any third-party apps. Following the steps below, we will show you how to manually select the network speed for the mobile data that can stabilize the network connection and help to access the high-speed 4G/3G internet for a seamless experience. Editor’s Note: In this article, we suggest to change the access point and network setting, that may cause to malfunction your phone. Please perform the steps below at your own risk. The setting may be slightly different based on your Android phone. We are using these screenshots for demonstration purpose. Also read: Hardware Solutions to Extend WiFi Network
Manual Network Selection
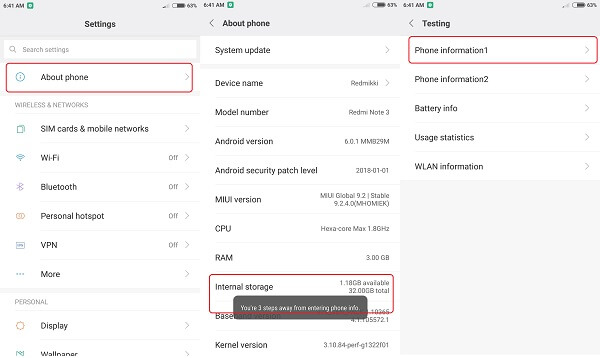
These settings are to register your mobile device on the fastest available network. Before you proceed, make sure that the mobile data is switched off before proceeding to modify any network settings. One your Android phone, go to ‘Settings’ and open ‘About phone’ and then tap on ‘Internal storage’ five times. This will open up the ‘Testing’ menu on your phone. Alternatively, this menu can also be opened by typing the code ##4636## on phone dial pad.
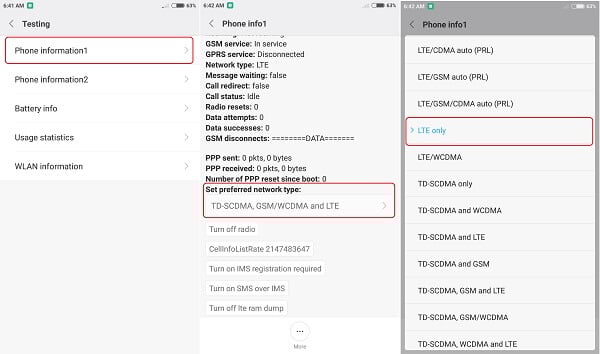
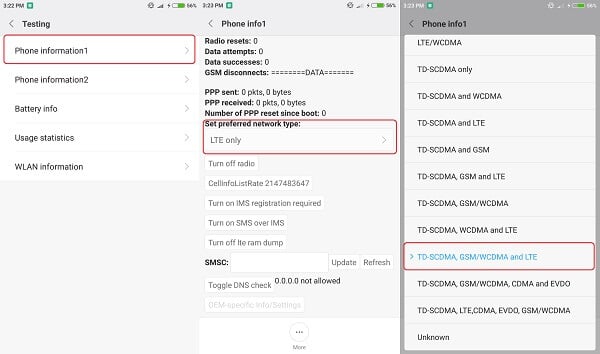
Now, open ‘Phone information’. Now scroll down the page to the ‘Set preferred network type’ column and tap on it to get the selection options. From the options, select ‘LTE only’ if your provider is supporting 4G and readily available to use as 4G network connection. Editor’s Note: If you’re using a dual SIM smartphone; this will show up as ‘Phone information1’ and ‘Phone information2’ on your screen. Select the first option for SIM 1 and the latter for SIM 2 depending on which SIM you use to access mobile data.
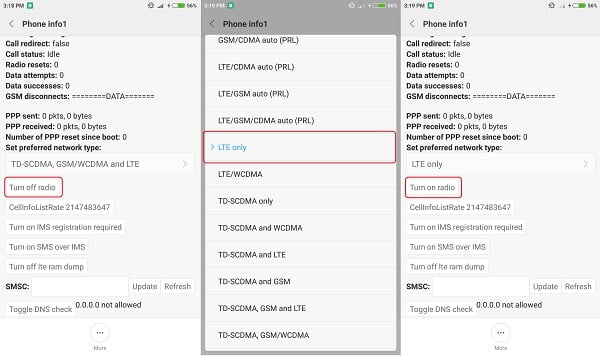
For 3G users, go and select the ‘WCDMA only’ option instead of 4G. You can use these options only if you are sure that 4G or 3G network is available in your area and a valid connection with 4G or 3G network is displaying on the phone respectively. If you experience no signal on the Android phone after performing this steps, or no 3G/4G available in that area, then please follow the steps below. Tap on ‘Turn off radio’ to toggle off network connection and then make the network switching as explained above step. Once this is done, tap on ‘Turn on radio’ to toggle network connection back on again and check if a proper signal is obtained; then exit from settings.
This step can be repeated multiple times until the fastest connection is obtained. It is also worth mentioning that if your smartphone still does not register to the fastest network, there is a low reception for the said network in the area. Next, we need to change the Access Point Settings on Android to match the Phone Settings.
APN Manual Settings
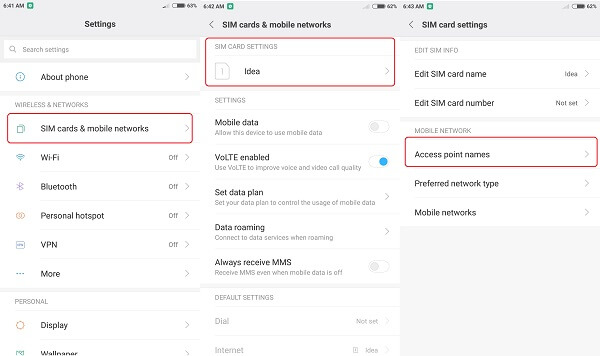
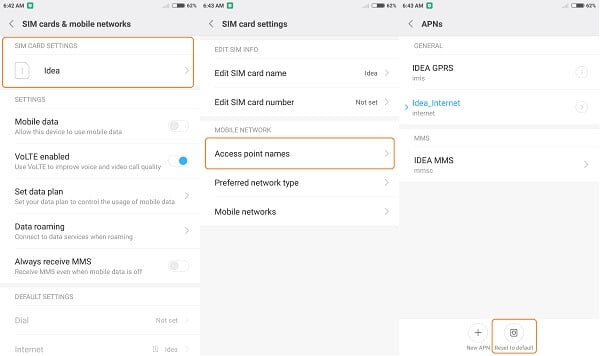
For this, we need to open ‘SIM cards & mobile networks’ from the ‘Settings’ menu. Under ‘SIM card settings’, select the network connection you use for mobile data. Then tap ‘Access point names’ to edit the settings for the access point which is currently selected.
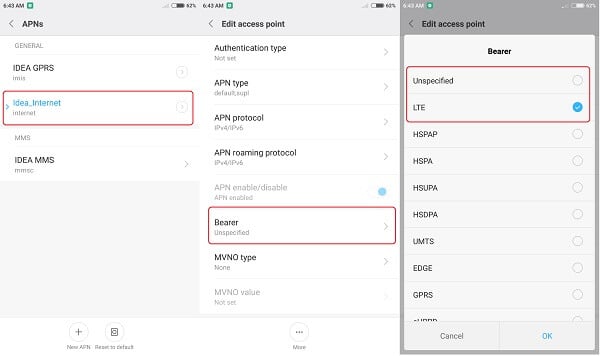
Scroll down to the bottom of the ‘Edit access point’ page and select ‘Bearer’ and then select ‘LTE’ if you’re using a 4G data connection. If you’re using a 3G data connection, you will need to select ‘HSPAP’, ‘HSPA’, ‘HSUPA’, ‘HSDPA’ from the list. Please make sure to uncheck ‘unspecified’ from the list before you save the settings and exit from the menu.
Now, by performing these steps, your network connection will no longer fluctuate between 2G, 3G, and 4G. Instead, the network type will be fixed on the fastest speed network such as 4G or 3G and you will get a smooth experience while browsing. Editor’s Note: Please note that when you restart the phone or turn on the airplane mode, these settings may revert to default. Also note that for 4G connections without VoLTE functionality, there may be dropped calls on the caller and receiver end. In case you run into any difficulties during this process or unable to obtain a proper connection you can revert back all your settings. Please read the steps below to revert back all the setting that you made the option back to default.
Restore APN Settings
Open phone ‘Settings’ and go to ‘SIM cards and mobile networks’ to select your mobile network from ‘SIM Card Settings’.
Now, tap ‘Access point names’, then ‘Reset to default’. This will reset APN settings back to default.
Restore Network Type
To change network type back to default, long press the power button and restart your device. Otherwise, open the phone dialer and type the dialer code ##4636## on the keypad.
Now tap ‘Phone information’, to select the option ‘TD-SCDMA, GSM/WCDMA and LTE’ from the ‘Set preferred network type’ menu. Also, you can open Mobile data settings under ‘SIM cards & mobile networks’ and change to any other network options back and forth.
Get Stable Data Connection on Android
Please note that internet speed is dependent on the data plan. Also, note that different network companies provide different quality of internet; so if you are facing constant slow speed internet, and connection errors, it will be better to contact the service provider or upgrading to a faster network with a proper signal reception in the area. You can try this above tweak if you are confident that your data connection is not stable in some locations and it is a location issue. This workaround on will bring back a stable data connection while you browse the internet on the Android phone. Initially, I also created an additional APN with the same settings as the other two above but this one I set at ‘Unspecified’. However, it seems this setting is the default APN and any kind of connection 4G, 3G, 2G, GSM just defaulted to this APN and the device it seems never needed to freely autoconnect to the other APNs ;-( . Just saying, for those who realized as I did (since the device autoconnects then why not create APNs for each Network Type excusively !?! ). Haha 😉
Δ